Paint correction

MAXMAX

Active member
Joined
Jul 19, 2024
Messages
133
Reaction score
36
Points
28
Location
Walnut Creek
I am in the process of fixing this scratch on the back bumper. It was a deep scratch. I applied 3 coats of paint fill the area and I have built up the the paint so I can sand it down flush level . I don't want to get too aggressive with sanding I am thinking 1500 grit? . Suggestions? I will polish the area after sanding then apply clear coat.
Thanks for any guidance!!!
 

Attachments

  • IMG_4806.jpeg
    IMG_4806.jpeg
    1.7 MB · Views: 6
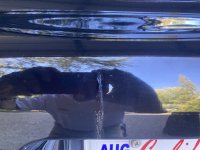
You're tackling what is easily one of the most difficult repairs in the industry.

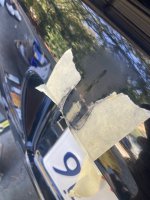
My best suggestion is to do your best to isolate all the sanding on the touch-up paint and avoid sanding on surrounding paint.

I have the Eagle Abrasives by KOVAX Toecut Kit and it works really well for isolated sanding. Mostly use to remover runs and sags, but same principals would apply here.


Tolecut PSA 8-Cut Block Sanding Sheets Job-PAK


The reason why you want to avoid sanding on the surrounding clearcoat paint is because the factory paint will tend to be harder than the touch-up paint.

This means, when you go to buff out sanding marks, the sanding marks in the touch-up paint will buff out fast because compared to the factory paint, it's going to be soft.

Now you'll be stuck with sanding marks surrounding the touch-up paint. As you continue to buff and buff, you'll heat the area up and often times simply yank the touch-up paint out of the repair or buff it off the car.

You can even try to place some thin painter's tape on the sides of the repair when you're sanding.

Also consider using a 1" microfiber pad on a tool like the RUPES Nano or FLEX PiXiE - both in Rotary Mode to remove the sanding marks out of the touch-up paint.

Again, the idea being to keep the "action" on the touch up paint alone and avoid buffing on the factory paint until the majority of sanding scratches are removed from the touch-up paint.

I have a similar type of scratch in an Electric Ford F150 I've been asked if I can fix it? I haven't answered yet. This type of work is more difficult than most people know.


Mike
 
  • Like
Reactions: Mak
I am starting to sand today I have to assume wet sanding would be best in this situation! I let the paint cure for 48 hours.
Nick
 
I am starting to sand today I have to assume wet sanding would be best in this situation! I let the paint cure for 48 hours.
Nick

To be honest, I think waiting a week and parking this portion of the truck in full sun would be best. You want that paint fully dry and hardened.

Let us know how it turns out.


Mike
 
Oh it's been hot here ! 90-100 in the afternoons and I did put the car out in the sun earlier in the week!😀
 
Had to use a bit of spot putty scratch was deep! Now I sit and wait!!!
 

Attachments

  • IMG_4832.jpeg
    IMG_4832.jpeg
    1.7 MB · Views: 4
Stopped waiting for paint and spot filler to cure 95 degrees this afternoon so that should help with curing!
 

Attachments

  • IMG_4835.jpeg
    IMG_4835.jpeg
    2.3 MB · Views: 3
I am in the process of fixing this scratch on the back bumper. It was a deep scratch. I applied 3 coats of paint fill the area and I have built up the the paint so I can sand it down flush level . I don't want to get too aggressive with sanding I am thinking 1500 grit? . Suggestions? I will polish the area after sanding then apply clear coat.
Thanks for any guidance!!!
 

Attachments

  • IMG_4842.jpeg
    IMG_4842.jpeg
    1.7 MB · Views: 5
I spent an hour sanding today. So far I have put 6 layers of paint on this scratch . I am getting close to finishing the project! I am wondering if I need to use a wool pad to start buffing out the area? I will wait for the paint to cure. The light area is sanding marks from 2000 grit sand paper.
I will finish with 3000 and 5000 grit wet sanding. Then apply the clear coat.
 
Here's your last picture. I cropped out the full.

full


Here's the deal. Fibers are a form of abrasive. Thus, when you compound a car with a compound and a wool pad you are using TWO types of abrasives. Throw in a rotary polisher, the most powerful paint correction polisher and you have a substantial combination to remove paint FAST.

This can work against you because you'll remove paint FAST.

Maybe start out with a foam cutting pad on a rotary with your choice of compound of polish and just see what can be done using this combo. The most common problem people have when trying to this type of repair is they overheat the touch-up paint and of course the component the paint is on, and you simply pull or yank the touch up paint off the surface. Now you get to start over.

So slow and methodical is the approach. Keep temps low.


Mike
 
I spent an hour sanding today. So far I have put 6 layers of paint on this scratch . I am getting close to finishing the project! I am wondering if I need to use a wool pad to start buffing out the area? I will wait for the paint to cure. The light area is sanding marks from 2000 grit sand paper.
I will finish with 3000 and 5000 grit wet sanding. Then apply the clear coat.
Do you have a photo of it sanded to your liking?
 
Back
Top